Our Second Love, Chocolate Dipped Cookies
Our Second Love
If you’re new to Wilbur’s of Maine Chocolate Confections there is something you should know about us, right off the bat. We love chocolate. That would seem obvious given that we are a chocolate company, but it just feels good to say it. WE. LOVE. CHOCOLATE.
As a result, there isn’t much we don’t cover in chocolate and quite successfully I might add: blueberries, cranberries, almonds, peanuts, gummy bears (you heard me), pretzels…the list goes on. Well, if we had to pick a second love, it might be cookies.
Chocolate Chip (obviously you’ve already read about that love story here) but there is another delicious cookie in your grocery store that begs to be covered in smooth milk chocolate. It’s called an Oreo. You pick your flavor, I’m not going to tell you how to live your life (Cool Mint, ahem) and dunk those babies into melted heaven, and don’t look back. So how do you create such a divine confection without them looking like something the cat coughed up?
Read on, lovelies….
How to Make Chocolate Covered Oreos
You Need:
- Oreos
- ½ lb. of chocolate (in this case Milk Chocolate) per sleeve of Oreos
- Microwave safe bowl
- Rubber spatula
- Two forks
- Parchment paper
- Cookie sheet/tray
- Sprinkles/decoration of your choosing
Step One:
Spread your chosen cookie tray with parchment paper, set aside.
Step Two:
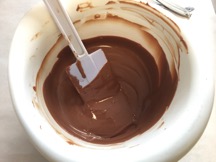
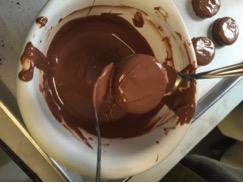
Melt and temper your chocolate in your microwave-safe bowl. What does temper mean? So glad you asked, read about that HERE. Don’t melt more than ½ lb. at a time. Otherwise, your chocolate loses its temper after about a sleeve of cookies. No, it won’t yell at you to clean up the kitchen. It turns white when cooled.

Step Three:
Bring your tempered chocolate and cookie tray to your workstation because it’s time for the magic. There are only four cookies shown in this picture, but you can do an entire row of the package with this amount of chocolate.
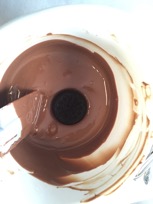
Working with one cookie at a time place a cookie into the bowl of chocolate.
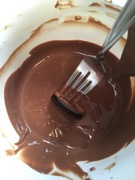
Gently use one of your forks to flip the cookie over in the bowl, covering the other side. Use one of your forks to gently fill in any areas on the sides where chocolate didn’t cover.
Scoop up the cookie with one fork and tap the handle of the fork gently on the edge of the bowl. The goal here is to tap off excess chocolate so your cookies resemble cookies and not something that fell in a mud puddle. Tap too hard and it’s cookie overboard.
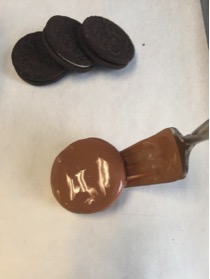
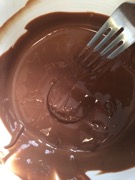
When the chocolate stops dripping from your cookie place the edge of your cookie onto the parchment and slide your fork out at an angle.
Having trouble?
Use your second fork to gently guide the cookie off the original fork and onto the parchment. This will help maintain a nice smooth top to your cookie; any fork marks will be on the bottom or one side only.

Step Four:
When all your cookies are dipped, it’s time to decorate. If you didn’t listen to me and melted more than ½ lb. of chocolate and are still dipping cookies you’re going to have to stop and decorate what you have done because if you don’t your first cookies will start to set up before you finish dipping the rest. Just another good reason to follow instructions. We used plain nonpareil for our cookies. They are fun and colorful and add a little crunch.
Step Five:
If you’ve tempered your chocolate, it is probably already starting to set at room temperature. If it’s the middle of August and the temperature of your house is approaching that of the surface of the sun or you are just impatient you can carefully transfer your cookie sheet to your refrigerator. Check after 5 minutes and every 2 minutes after that. While your refrigerator is cool it is also humid and moisture is the enemy of chocolate.
Step Six:
EAT! Nom nom nom. Whatever you don’t eat can be stored in an airtight container at room temperature for a good, long time.
How long?
I doubt we’ll ever find out, they just seem to disappear.